GPS Programming
Preliminary Notes
GPS stands for Global Positioning System. GPS is a satellite-based system owned by the United States government which is used to provide positing data to both public and governmental entities. A very basic explanation of GPS is that it measures the location of an object (in our case the Balloon) relative to a satellite orbiting earth. The position of the satellite is known, which means that if we know our balloons location relative to multiple satellites we can determine the location of our balloon relative to earth's surface. Luckily for us when buying a GPS module all the processing to get the location of the module is already done. This means that all we have to do is to read and receive the GPS data from the module which can usually be done using any USART port.
Before going into more detail about what a USART port is and how we can communicate with the GPS module using an Arduino, it is necessary to look at laws and regulations on GPS in the United States. Most notably the COCOM regulation prohibits the use of GPS while moving at speeds greater than 1200mph, while at altitudes greater than 59,000 feet. Unfortunately, many GPS manufacturers interpret this as meaning that a GPS cannot operate at altitudes greater than 59,000 feet. This poses a problem since my HAB will ideally reach altitudes exceeding 100,000 feet. There are some products which do not impose this regulation and instead more closely follow the regulation of stopping operation if the GPS is at altitudes greater than 59,000ft AND moving at speeds greater than 1200 mph. There are two such modules that I am aware of that meet this requirement. I will give a tutorial for programming both on this page.
Adafruit Ultimate GPS
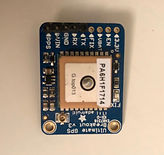
The board that I used for my first ballon was the Adafruit Ultimate GPS breakout board. Although advertised not to this board did stop working at 59,000 feet. Despite this, I otherwise liked this board so much that I still suggest using it. On the first launch of my balloon, the Adafruit was able to re-establish it's GPS lock while plummeting to earth. This meant that even though there was a time where I did not get GPS updates, I was still able to easily find the balloon because the GPS was able to reconnect once it was back below 59,000 feet The GPS coordinates from this module were also accurate enough that I was able to watch the balloon drift out of the sky 40 miles from where it was launched. Although I am hoping to use a different GPS module for the third balloon, I still found this module to be very easy to use and great for beginners. Additionally, this module is still the only module I have successfully launched into space at this time.
Whats Needed
-
Arduino UNO
-
Arduino IDE
-
Ada fruit GPS
-
4x Jumper Cables
-
Breadboard
Getting Started


The first step is to download the Arduino IDE. This can be done by following the link below. Once this is done we need to download the libraries required to communicate with the Adafruit GPS. In a nutshell, these libraries allow the Arduino to communicate with the GPS module without requiring extensive programming. These libraries allow us to build on the work of others to expedite our projects. For this tutorial, the library that we need to download is the NEO GPS library, which can be found below. Adafruit also created a library to control the Adafruit GPS but I have found it to be inferior to the NEO GPS library. The last library that we are going to need for this project is the AltSoftwareSerial library which can be found below. This library allows us to emulate additional serial ports on the Arduino using the digital pins.
Next, we need to wire the Adafruit GPS to the Arduino to do this we need to connect the wires as follows
-
Arduino 3.3 volt --> Adafruit VIN
-
Arduino GND --> Adafruit GND
-
Arduino Pin 9 --> Adafruit RX
-
Arduino Pin 8 --> Adafruit TX
The rest of this tutorial is found on Github where I have a commented version of the code.
Ublox Neo GPS
Note first that the UBlox GPS has ports which are identical to the ports of the Adafruit GPS. For this reason, I will not be repeating the connection tutorial above. Additionally, note that this setup is a bit more in-depth than the Adafruit setup but that the result is a communication protocol that sends the same information using less data (fewer bytes) meaning communications can be sped up.
To program the Ublox GPS there are tutorials which already exists which are extremely useful. One of my favorites is included below along with a GitHub repository which contains code from the tutorial. The original tutorial did a good job of explaining how to get the GPS up to a point where it can be coded but the code itself is poorly commented. Below is a commented version of the code and the tutorial itself. This tutorial should apply to any of the Ublox NEO GPSs
In addition to these resources, I also wanted to give a brief explanation of the UBLOX message as it is very similar to the MavLink messages that are used in later tutorials. Before we begin, note that all data in computers is sent as 1s and 0s, this is known as binary. In binary, a single 1 or 0 is known as a bit. eight bits make up a single byte. The more bits/bytes that make up a number the larger the range of numbers that can be represented with that binary sequence. For example, imagine we have two bits then we only have 4 combinations we can make with those bits.
11,10,01,00
Since there are four combinations available we could represent 4 different objects with those bits. For example, we could assign meanings to the combinations as follows
00 -> 0
01 -> 1
10 -> 2
11 -> 3
Note this is just one way we can use and in fact, binary can be interpreted many different ways. That is is to say that depending on what kind of data is being sent the 1s and 0s might need to be interpreted differently. For example, if I wanted to send the number pencils in my backpack I might send it as an unsigned integer. The fact that the variable is unsigned means that it cannot be negative. So for example, if I were to have the following sequence of ones and 0s,
10110101
then that would mean I have 181 pencils. Note that the process of conversion to and from binary is not that important here. Now instead let us say that I am the kind of guy who borrows other people's pencils. And pretend I have borrowed so many pencils that I now owe people pencils. Just as before I want to send a number which represents the number of pencils I have or owe. This time it makes sense for the number to be negative since I could define that negative pencils means that I owe other people pencils. Now, in this case, it makes sense to store the binary number as an integer. In this case, if I had the same binary value
10110101
My binary would not represent 181, but in this case, it would represent -75. Again the math here is not important, what is important is to understand that the same sequence of 1s and 0s has multiple different interpretations. What this means for us is that to properly interpret data in a stream of binary data we need to know what the binary data represents. Is the data representing the possibility of negative pencils or is it only a positive number. Now note that if two devices are communicating at a higher speed the binary stream could be any combination of 1s and 0s and it will be very difficult to tell where our message starts and ends. For example, imagine we have the same binary used above but now it is inserted into a binary stream
10010110110101001111111011010100100
Now how would the Arduino ever know when to start recording the ones and zeros so that it could determine which set of 8 bits is actually, representing the pencils in my backpack or the total number of pencils I have/owe. To achieve this many communication protocols will implement a start character. What this means is that a specific sequence of binary numbers will be used to tell the Arduino a message is following. So now say we want to send the number of pencils in my backpack and let us say that we want a byte of data to be used to signify the start of the message. This time our binary message might look like,
1111111010110101
Note now that the green highlighted binary is used to signify the start of a message, so until the binary sequence in green is received the Arduino will consider the data meaningless. This green binary could be any binary code, but it must be known by both devices at the start of communications. Once we do receive the starting character the data immediately following the start will be recorded.
Things are looking good now, it is clear how the binary data can be used to send data and signify the start of a message. One drawback of the current method is that it only can send a single message. In the current configuration, it is necessary to write the code for the Arduino such that it interprets the data behind the start character as either the pencils in my backpack or the total pencils I have/owe. But what if I wanted to send both of these values over the same communication protocol? How could the Arduino know when I was sending the number of pencils in my backpack vs the number of total pencils I have/owe.
This can be done using a message identifier. A message identifier is just another byte of data that will go in front of our binary message. The value of this byte will then tell the Arduino what the following data represents. For example, let us assign two different identifiers for our two messages.
For the number of pencils in my backpack choose the identifier 00000001
For the total number of pencils I have/owe choose the identifier 00000010
Now imagine I have 10 pencils in my backpack which is represented by 00001010 and that in total I have -20 pencils (so I owe people pencils) which is represented as 11101100
The transmission of both of this data might then look something like
111111100000000100001010111111100000001011101100
In this case, green is the start character, red is the message identifier and blue is the data.
We could continue adding pieces to our message above so that maybe if multiple devices were connected to the same communications network it would be possible to determine where the message is going to. Or maybe we include bytes at the end to ensure the message was sent correctly. Or perhaps we add a guide for what the data means in each message, that way we can send multiple pieces of data in the same message.
In the video below the protocols for various Ublox messages will be described and used, through the whole video be sure to remember that all these protocols do is describe how we should interpret data sent over a serial port. It does this by defining things like the start and end of a message, the contents of the message, etc. Hopefully, the above tutorial will have given you greater insight into interpreting these messages.
Final Notes
While going through tutorials on google about the various GPS trackers I came across this useful hint which is relevant for people who are making their GPS as well as for those who are using a store-bought tracker. Note that all GPS units rely on antennas and all antennas have a direction they should be oriented in. If an antenna is not oriented in the right direction, the antenna could likely fail to get a strong signal. To prevent this issue from happening one suggestion was to use a spill-resistant bowl like the one below.

This bowl was designed to keep children from spilling their food. It does this by allowing the center bowl to rotate such that the opening is always facing upwards. By placing our small GPS patch antennas into this bowl we can ensure that the antenna will stay facing the sky even if the rest of the payload is upside down. The original use of this idea can be found through the link below.